Hardwood Floor Scratches: What You Can Fix and When to Call a Professional
Hardwood floors experience everyday movement, chairs slide, footsteps shift, pets run across hallways. Over time, those details give the wood its warmth and personality.
The goal isn’t to keep a floor spotless, but to understand how to care for it, what can be managed at home and when it’s time to call in a professional.
Understanding the layers beneath a scratch
Every hardwood floor is built in layers. The protective top layer includes the protective finishes, while the wood beneath provides structure and character. Where a scratch falls within those layers determines the correct approach.
Surface scratches (finish only)
These scratches affect only the protective coating and do not cut into the wood itself. They often appear as scuff marks that fade when viewed from certain angles.
Moderate scratches (into the wood grain)
These scratches penetrate the finish and expose bare wood. You can usually feel them with your fingertip. Once the wood is exposed, moisture from damp mopping, water stains, or spills can enter the grain.
Deep gouges or cracks
When scratches cut deeply into wood floors with a compromised wear layer, the damage cannot be hidden through cleaning alone.
Understanding this difference helps avoid treating cosmetic wear like structural damage, or overlooking issues that deserve attention. Our post on Hardwood Floors: Expectations vs. Reality explains why some marks are part of normal aging while others indicate finish wear.
Subtle Repairs That Keep the Floor Looking Its Best
Light marks are part of normal wear and usually easy to manage. The focus is on preserving the floor’s character and keeping it looking its best as it continues to age naturally.
- Buffing and cleaning: Sometimes marks are not scratches at all, but film buildup from cleaning products. A microfiber cloth, or a microfiber dust mop can restore clarity without harming the protective layer.
- Blending sticks or filler: Wax sticks matched to the floor’s color help fill shallow grooves and protect exposed grain. After application, buff lightly with microfiber cleaning pads to blend the repair.
- Finish refreshers: Some floors can benefit from a compatible refresher that restores sheen and reinforces the protective top layer without sanding.
- Skip home remedies: Mixtures using olive oil, lemon juice, acidic substances, or harsh cleaners can damage protective finishes, create film buildup, or interfere with future recoating.
Household mixtures and abrasive cleaners tend to leave residue or interfere with future recoating. We see this often in projects discussed in DIY Projects Homeowners Regret Doing the Most, where small missteps create bigger repair needs later.
When to Bring in a Professional
Once scratches start cutting into the wood or showing across wide areas, is when a professional can help you restore the surface.
Spot repairs:
Localized damage can often be sealed using professional grade tools and matching materials. The goal is to blend the repair into the grain so it disappears and keeps moisture from reaching the wood underneath.
Screen and recoat:
For widespread dullness in high-traffic areas, a light abrasion followed by a new protective coating. This process restores protection without sanding through the wood itself and brings back a uniform look.
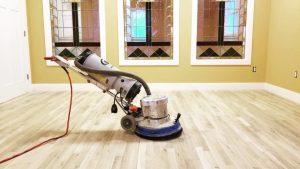
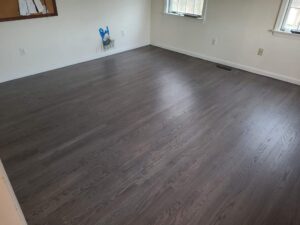
Full refinishing:
When deep scratches, fading, or uneven color go beyond small fixes, sanding down to bare wood and applying a fresh stain and finish gives the floor a clean start. It removes years of marks and wear, extending the life of the flooring for decades to come.
Timing matters here. Addressing wear before the wood is compromised usually limits how much material needs to be removed. Our guide on How Much It Costs to Sand and Refinish Hardwood Floors walks through how scope and timing affect the process.
Everyday Care That Makes a Real Difference
Most wear on hardwood builds up slowly, small habits make the biggest difference in how long a finish lasts.
- Use felt pads or furniture protectors under furniture legs
- Place entryway mats to trap grit before it reaches the floor
- Dry clean regularly with a microfiber dust mop or dusting pads
- Damp mop only when needed using a pH-neutral wood floor cleaner
- Avoid steam cleaning, steam mops, and excess water
- Clean spills promptly to prevent moisture damage
Homes with pets benefit from consistent nail trimming and attention to high-traffic paths, which we explore further in Paws, Claws, and Floors.These habits don’t prevent wear entirely, but they keep it predictable and easier to manage over time.
The Patrick Daigle perspective
After four generations working with hardwood flooring, we have learned that scratches are part of a floor’s life. Most floors do not need aggressive sanding or replacement. They need proper cleaning, thoughtful maintenance, and professional attention when wear reaches the wood itself.
Our role is to help homeowners understand what their floors are telling them, whether that means reassurance, a simple touch-up, or a professional refinishing plan.
Meta Description
Understand the difference between surface scuffs and deep gouges, plus when cleaning, spot repair, or refinishing makes sense.
Image- https://patrickdaigleflooring.com/wood-flooring-trends/
Keywords- hardwood floor cleaning,best way to clean hardwood floors,how to remove scratches from hardwood floors,what to use to clean hardwood floors,hardwood flooring